Okay, it is seventy degrees out and time to crank out some delicious summer food and beverages, finally! I was trying to figure out with my sister what to have for dinner, and I remembered of a concoction that Claire Hawkins had told me she made. Thus, we decided to have this chocolate milkshake and Sweet Potato Fries. This was definitely a good way to kick off the warm weekend. (As the weather gets warmer, I tend to get busier because a lot of my time goes to exercising my horse for races. Thus, posts will not be coming as often because my kitchen time will be limited. Sad but true.)
Like I said, this inspiration came from my good friend. We had skyped the night before for somewhere around two and a half hours. It was well over due, and I am sure we both could have talked for another two and a half. However, we decided that we both needed to sleep. About one and a half hours into our conversation we realized that probably about seven-eighths of our conversation was about food. Yes, that is the absolute truth, and that is one reason why I love her! We both can understand each other's love for food and that we get judged for this love. (maybe an obsession...) Anyway, Claire and I have spent many days in the kitchen experimenting with random foods. Every time we are in the kitchen together we learn a lesson. Some include, do not mistake bay leaves for basil, do not try to juggle eggs, if a recipe says parchment paper do NOT use wax paper, and read the directions carefully. That is just a select few; there are many many more!!
In the midst of our conversation, Claire had told me about a drink/smoothie that she had made that was delicious. She told me all that was in it but she did not know her measurements. Since last Friday was so nice, I was in the mood for a chocolate malt. However, regular malts are out of the question for me, so I decided to try to figure out what how much of each ingredient to use from what Claire said she put in hers.
I have made this about three different ways. The one I included is my favorite version. The first time I made it, I did not use Maca powder, and I did not use a frozen avocado. I highly recommend doing both. The Maca powder gives the milkshake a malt taste and a nutritional boost, and the frozen avocado creates a more malt like texture. (It also helps make it colder). The other way I made this milkshake was for my sister. She is not much of an avocado person, so I substituted about 1/4-1/3 cup honey Greek yogurt for it. She said it was phenomenal. However, it was slightly runnier than mine. (So maybe freezing the yogurt might help). I personally do not think there is an apparent avocado taste, but she said that she could still taste it a little. I highly recommend adding in other flavors that you like with chocolate. Maybe peanut butter, mint, carmel, or any other preference. You could also load it with spinach, chia seeds, flax seed, hemp hearts, or sesame seeds to boost the nutritional value. It is all up to you for what you prefer! Hope you enjoy this as the weather warms up here in the good state of Minnesota!
Chocolate Milkshake
Inspired by Claire Hawkins
Ingredients:
1 cup almond milk
1/4-1/2 frozen avocado
1 tsp. vanilla
2 tsp. Maca powder
1 frozen banana
2 Tbsp. heaping, ocoa powder
1-2 Tbsp. honey
Directions:
1. Place all ingredients in a high-powered blender.
2. Blend until combine throughly and smooth.
3. Pour into a glass and enjoy!
"Find something you're passionate about and keep tremendously interested in it." ~Julia Child
Monday, April 29, 2013
Sunday, April 21, 2013
Greek Yogurt Drop Biscuits
I don't know about you, but my favorite thing from KFC when I was a child were their biscuits! They were fluffy, warm, soft, and oh, so delicious with homemade strawberry jam. Yumm... However, I am pretty sure they were packed with butter, and ingredients that I can no longer eat. Thus, I decided to make my own biscuits that I could enjoy.
I was inspired to make these after I made the Pumpkin or Sweet Potato Biscuits a couple of weeks ago. I thought to myself, if those biscuits tasted so good, I bet I could make some darn good plain ones. What do you know? I was able to go slightly off that recipe for measurements, so I could get the same consistency for these beauties. With adding and changing up ingredients, this is what I came up with. They are darn good too!
These biscuits are moist, healthy, and delicious. They really could fool anyone. I mean I am going to be honest they are not as light, fluffy, and buttery as KFC's biscuits, but they are a scrumptious healthy substitute! One that you won't regret eating and will feel lovely after eating it. They taste great plain or with apple butter, honey, strawberry jam, or any other thing you prefer to put on biscuits. I was hoping to have a classic childhood dish my mom used to make, chicken and biscuits, but it did not turn out to my liking. So I will have to attempt that again and share that recipe if it turns out. Hopefully you enjoy these delicious biscuits! My family sure did.
Greek Yogurt Drop Biscuits
Yields 12 biscuits
Ingredients:
1 2/3 cup oat flour (ground rolled oats)
2/3 cup ground flax seed
1 cup spelt flour
1/3 cup almond meal
2 Tbsp. psyllium seed husk
2 tsp. baking powder
1/2 tsp. sea salt
1 cup plain Greek yogurt
2/3 cup almond milk + about 3 Tbsp. (or any other milk)
1/3 cup coconut oil (at room temperature. If you like more moist biscuits add 2-3 Tbsp. more)
1/4 tsp. cream of tartar
Directions:
1. Pre-heat oven to 450F degrees.
2. Add all the dry ingredients to a blender and pulse until combine.
3. Add in the coconut oil and pulse until combine until it reaches a sandy texture.
4. Pour the flour and coconut oil mixture into a bowl and add the rest of the wet ingredients.
5. Use a pastry blender or a spoon to mix the ingredients together completely.
6. Drop the biscuits on a parchment lined baking sheet about 2 inches apart. Shape into circles with your hands.
7. Bake for 18-22minutes.
8. Best when eaten warm!
Friday, April 19, 2013
Bean and Veggie Salsa
Everyone loves a good salsa! Well let me tell you, this one is a good one. It is loaded with veggies and some beans. Great to get those vitamins in and protein too. It has been a hit at potlucks and when serving it to company. This salsa also reminds me of summer, so it was refreshing with the cold weather outside.
This salsa became a staple food for grill nights in my house last summer. When we had burgers, we had this salsa. If we were having grilled barbecue chicken, turkey, or pork chops, you could always count on this being at the table. Just writing about this makes me excited to enjoy dinners on the patio again! It is a great addition to the dinner table. A wonderful side or snack that the whole family will love!
This salsa is very colorful as you can tell. As it is loaded with veggies, it is loaded with flavor! A definite must try. If you are using any frozen vegetables, I recommend thawing them fully before adding them into the salsa because otherwise it will get really watery. It still will get a watery because of all the vegetables, but it will help a lot to thaw them out before hand. Also, if you want to add some kick to it, add a jalapeño or a chili pepper. I am all for that! Just know what you are getting yourself into. I would not go too overboard with jalapeño peppers, or you may be living with a water bottle by your side for a few days. You can play around with different veggies and/or beans to fit best fit your taste preference.
Bean and Veggie Salsa
Adapted from Soupbelly
Ingredients:
15 oz. can black beans, drained and rinsed throughly (or you could cook your own beans...highly recommend)
15 oz. can black-eyed peas, drained and rinsed throughly (again highly recommend cooking them yourself)
3 medium tomatoes, chopped and drained
2 cups frozen corn kernels, thawed completely
1/2 medium onion, chopped (white or red)
1/2 green bell pepper, finely chopped
1/2 tsp. sea salt
3/4 cup chopped cilantro, more or less depending on desired taste
1 like, juiced
Italian salad dressing*
*Italian Salad Dressing Recipe
1 Tbsp. garlic powder
1 Tbsp. onion powder
1 Tbsp. stevia
2 Tbsp. dried oregano
1 tsp. ground black pepper
1/4 tsp. dried thyme
1 tsp. dired basil
1 Tbsp. dired (or fresh) parsley
1 tsp. sea salt
1/2 tsp. red pepper flakes
2 Tbsp. red wine vinegar
1/3 cup extra virgin olive oil
Directions:
1. In a small bowl, mix all the ingredients for the dressing together. Set aside.
2. Chop all the ingredients that require it and add in a large bowl.
3. Add the remaining ingredients to the large bowl and stir until well combine.
4. Cool in the refrigerator for at least 20 before serving.
5. Serve with chips (my favorite are these Blue Corn Chips). Enjoy!
Thursday, April 18, 2013
Mango Cashew Sunshine Bites
It was raining earlier today, and now it is snowing. It's April...so slightly depressing. This just happened to be the perfect treat to brighten up the day. I took one bite, and it brought me back to the warm summer days. That lasted until I looked outside again, sadly. But for a moment I escaped to paradise.
I was not quite sure what mango and lime would taste like together, but sure is delicious. I should never have questioned a recipe that Sarah Britton created. She has yet to fail me. If you need a good, healthy, and nutritious recipe, check out her website. All her ingredients are added for a reason and all contribute to the nutrition.
I have to say it was killer to wait as the cashews were soaking. So definitely find something to occupy your time while they soak. As for the ingredients, make sure the cashews that you use are raw and not roasted. Dried mangos are usually sulfured and sugared, so try to veer away from those and purchase the organic unsulfured mango pieces. Coconut also usually comes sweetened, which means added sugar. Organic unsweetened coconut can usually be found in any grocery store if they have a health food section. Otherwise, make a trip to my favorite place: the health food store!
These bite size tropical treats were a hit in my house. They have healthy wholesome ingredients, which makes them taste even better. The texture is very creamy...so good! Hope you enjoy these summer treats (even winter treats if you need a little summer joy).
Mango Cashew Sunshine Bites
Recipe from My New Roots
Makes approximately 20-24
Ingredients:
2/3 cup / 100g raw cashews
1 cup/ 100g dried mango pieces (purchase organic, unsweetened, unsulfured)
1/2 cup/ 50g unsweetened desiccated coconut, plus more for garnish
1-2 tsp. Creamed honey, for sweetness if desired
seeds of 1 vanilla bean (I used 1 tsp. vanilla)
lime zest (from 1 lime)
pinch sea salt
pinch ground turmeric (optional...I did not include this)
Directions:
1. Soak cashews for four hours. Drain and rinse.
2. Soak mango for 20-30 minutes until slightly softened, but not mushy.
3. In a food processor combine all ingredients except honey. Pulse to combine until a sticky dough is formed. Taste for sweetness and add honey if desired.
4. Spoon out about a 1/2 tablespoon amount of dough at a time and roll into a ball with your hands. Roll in coconut to coat. Store in the fridge for up to 2 weeks.
Tuesday, April 16, 2013
Fudgy Multigrain Cookies
Fudgy, chocolatey, healthy, and phenomenally delicious cookies! Seriously, though, these cookies are amazing! This is a cookie that could fool anyone. I do not think I can express in words how delicious they are! Let's just say...these are a MUST try in your kitchen.
I always love when I can find a healthy treat. I love it even more when it tastes like heaven. (Which this one comes close to.) The name of the cookies says it all. Fudgy Multigrain Cookies. They sure are fudgy! They also contain many grains: oatmeal, hemp hearts and spelt flour. Yes, they are cookies that melt in your mouth.
My mom loves them, my sister loves them, and I love them! (My dad is in Japan, so he has not had the chance to try them. But I am sure he would love them too.) You are probably getting sick of me raving about these cookies, but they are seriously so good. You just have to make them. I hope you like them as much as I do!
Fudgy Multigrain Cookies
Adapted from My New Roots
Yields 32-34 cookies
Ingredients:
1 cup old fashion oats
2/3 cup spelt flour (or any other whole grain flour)
1/3 cup hemp hearts, ground to powder
1/2 tsp. baking soda
1/2 tsp. sea salt
1/3 cup almond butter (or any other nut butter like peanut, cashew, hazelnut)
2 Tbsp. coconut oil, softened
1 cup coconut sugar
1/2 milk (almond, coconut, dairy)
2 tsp. pure vanilla extract
2/3 cup dark chocolate chips (I used Endangered Species 88% Dark Chocolate chopped)
1/3 cup coarsely chopped walnuts
Directions:
1. Preheat oven to 325F. Line several large baking sheets with parchment paper.
2. In a small bowl, mix together oats, spelt flour, ground hemp hearts, baking soda, and salt.
3. In a large bowl, mix together softened coconut oil and nut butter until well blended. Add in remaining liquid ingredients.
4. Add the flour mixture to the liquid mixture and stir with a wooden spoon until combine.
5. Add in chocolate chips and walnuts. For tender cookies, do not over mix the dough.
6. Drop dough by large spoonfuls onto prepared baking sheets, spacing about 2 inches apart.
7. Bake for 12-15 minutes or until set and the tops appear dry. Let cool on baking sheets 5 minutes before transferring to wire cooling racks. Enjoy!
Saturday, April 13, 2013
Pumpkin or Sweet Potato Biscuits
These biscuits were part of my baking night the other day. Yes, I agree they look kind of interesting and maybe even a little too weird for you to try. However, it is worth taking a bite of one because after that there will be no turing back! They are just scrumptious.
My whole family loved these. Yes, even my dad! Lauren wins again. I must have been really tired when I was eating dinner, or I just subconsciously deciding I wanted two full biscuits. After I ate one, I decided I wanted just a half of another one. So I sliced it in half, and before I knew it, both halves had honey on them. I am not going to say I was utterly disappointed of my mistake because I ate the other half enjoying every moment of it!
I made these biscuits with pumpkin puree because my dad is not a fan of sweet potatoes. However, I am sure that they would be extraordinary with the sweet potato puree. They are good eaten plain, butter, topped with honey, or even topped with apple butter. I am sure you could come up with many other delicious combinations also. I hope you enjoy them!
Recipe from Season to Season Eating
Ingredients:
1 2/3 cup oat flour (ground rolled oats)
1 2/3 cup corn meal
1/3 cup almond meal
3 Tbsp. arrowroot or corn starch (psyllium seed husk would work too if you are feeling adventurous)
1 tsp. baking powder
1/2 tsp. sea salt
1 cup cooked sweet potato puree or pumpkin puree
2/3 cup almond milk + about 3 Tbsp. (or any other milk)
1/3 cup coconut oil (at room temperature. If you like more moist biscuits add 2-3 Tbsp. more)
1 tsp cinnamon
dried or fresh herbs (parsley, oregano, thyme, rosemary)
Directions:
1. Pre-heat oven to 450F degrees.
2. Add all the dry ingredients to a blender and pulse until combine.
3. Add in the coconut oil and pulse until combine until it reaches a sandy texture.
4. Pour the flour and coconut oil mixture into a bowl and add the rest of the wet ingredients.
5. Use a pastry blender or a spoon to mix the ingredients together completely.
6. Drop the biscuits on a parchment lined baking sheet about 2 inches apart. Shape into circles with your hands. I made 12 biscuits from one batch.
7. Bake for 22-25 minutes.
8. Best when eaten warm!
Friday, April 12, 2013
Chicken Broccoli Alfredo with Cauliflower Cream Sauce
After a long day of studying and writing papers, I decided that I would treat myself to a night in the kitchen. Sometimes nothing is better than turning up the music and cooking away! My night included, making this dish for dinner along with pumpkin cornmeal biscuits and a batch of chocolate chip cookies, obviously not any ordinary batch.
I found the recipe for the cauliflower cream sauce awhile ago, and I have wanted to make it for the longest time. Thankfully, we had cauliflower in our refrigerator, so I could make it. This sauce is very easy to make. I highly recommend using vegetable or chicken stock to boil the cauliflower in to add more flavor to the sauce.
This dish was a hit! Everyone in my family loved it. However, I did not let the broccoli steam long enough because I got impatient, so there was a slight crunch. The flavor is surprisingly delicious. I never would have guessed that the sauce was made out of cauliflower. It is up to you for any other spices that you would like to add. If you like a lot of flavor, you may want to add some more spices, but it still was absolutely delicious the way it is.
Serves 4-6
Ingredients:
1 lb. chicken breast
2-3 cups broccoli
mushrooms, if desired
1 batch of cauliflower cream sauce, recipe below
2 1/2 cups of brown rice pasta noodles (I used elbow noodles, but any other would work)
Directions:
1. Prepare cauliflower cream sauce, set aside.
2. Chop broccoli and mushrooms to bite size pieces and steam until fork tender.
3. While the broccoli is cooking, slice chicken into desired size, and cook on stove.
4. Boil a pot of water and add noodles, and cook until the noodles are done to your preference.
5. Combine the steamed broccoli, mushrooms, cauliflower cream sauce, and chicken and heat through.
6. Serve noodles topped with the broccoli, chicken, mushrooms, and cream sauce.
7. Top with parmesan cheese or any other cheese if desired.
Cauliflower Cream Sauce
Adapted from Pinch of Yum
Ingredients:
3 cups cauliflower florets
3-4 cups water or vegetable broth (highly recommend the broth for more flavor...could also try chicken broth)
5 cloves garlic, minced
1 Tbsp. olive oil, coconut oil, or butter
1 tsp. sea salt (or to taste)
1/2 tsp. peper (or to taste)
1/4 cup milk (could replace with plain Greek yogurt for a more creamy texture)
dash of oregano, onion powder, and basil
Directions:
1. Bring water or vegetable broth to a boil, and add cauliflower. Cook for 7-10 minutes or until it is fork tender. Do not pour out cooking liquid!
2. Saute minced garlic in olive oil until fragrant not burnt. Just as the garlic starts to turn golden take off heat.
3. Add the cauliflower plus 1/2 cup of cooking liquid in a food processor or high speed blender.
4. Add in remaining ingredients until desired consistency is reached.
Thursday, April 11, 2013
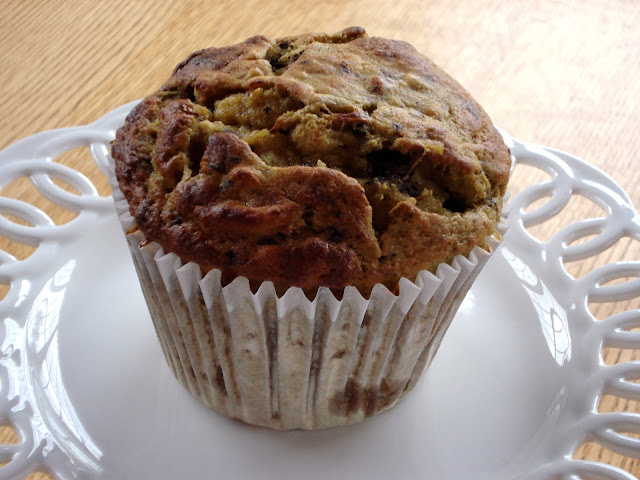
One Giant Banana Muffin
I had been craving banana bread for the longest time, and when my cousin told me she made banana muffins, I knew it was time for an experiment day in the kitchen. I grabbed some ingredients and started throwing stuff in a bowl and mixed away. Of course, tasting it as I went to make sure it would taste okay.
This recipe makes one jumbo muffin. You could probably get about three normal muffins out of if desired. However, this muffin only rises slightly, and once it is taken out of the oven it falls slightly. Since there is coconut flour in the muffin, if you let the batter sit, it will thicken up a bit.
This is definitely a winner of a recipe! My sister absolutely loves them. She even asked me to make them for her boyfriend when he comes this weekend. That is a big thing considering he is not a health freak like me. The recipe makes a very moist muffin. The chocolate adds a lot, so I would definitely not skip on it! Hope you enjoy it!
Giant Banana Muffin
Yields 1 giant muffin or about 3 normal size muffins
Ingredients:
1 Banana
1 egg
1 tsp. vanilla
¼ tsp. baking soda
¼ tsp. baking powder
1/16 tsp. nutmeg
1/16 tsp. allspice
1/8 tsp. sea salt
1 Tbsp. + 1 tsp. coconut flour
2 Tbsp. stevia (this could be substituted for any other dry sweetener)
2 Squares 80% dark chocolate, chopped (chocolate chips will work too...and you can always add more)
Directions:
1. Preheat oven to 350°.
2. In a small bowl, mix egg and banana. Make sure the banana is mashed well.
3. Add remaining
ingredients. Mix until combine.
4. Line a large muffin tin with paper muffin tin.
5. Bake in oven for 20 minutes. After those 20 minutes place a piece of tin foil over it if the muffin starts to get dark, and bake for
another 5 minutes.
6. Let cool slightly before indulging in the deliciousness!
If you are going to make regular sized muffins, I would keep an eye on them for time wise. I have not made them this way, so I am not sure how long they would take.
Sweet Potato Fries: Two Versions
Who does not like sweet potato fries? If you have never tried them, you are truly missing out. They are fabulous! Of course, homemade baked sweet potato fries are my favorite. Sure you can get the greasy fried sweet potato fries, but why when these are so delicious, healthy, and easy to make!
Sweet potato fries are great for a side with burgers, maybe a lunch, or even a midnight snack! Every time I have these they hit the spot! The recipes that I use is very easy to change up. You can add more of a spice or less depending on your preference. Personally, I like them pretty spicy! I dip my sweet potato fries in Plain Greek Yogurt. It is a great combination, and it also helps tone down the spiciness.
This time around I made two different kinds of sweet potato fries. I made my normal batch as well as Sarah Britton's version. I still am not sure which one I like best. They are both very delicious. I recommend trying them both out and figuring out your preference. Also, play around with the spices to fit your preferred taste.
Sarah Britton's Crispy Cornmeal Sweet Potato Fries Original Sweet Potato Fries |
Crispy Cornmeal Sweet Potato Fries
Recipe from My New Roots
Serves 3-4
Ingredients:
2 – 3 large sweet potatoes2 Tbsp. melted coconut oil or ghee
4 Tbsp. cornmeal / polenta
1 tsp. sea salt (more to taste, if desired)
Extra Flavor Add-ins:
garlic powder
ground cumin
smoked paprika
cayenne
black pepper
dried parsley
ground cumin
smoked paprika
cayenne
black pepper
dried parsley
Directions:
1. Scrub the sweet potatoes well under running water. Slice them into long sticks 1cm thick (between ¼” and ½”). Place them in a bowl of water, swish around a few times, then drain (this step helps remove some of the starch from the potato). Place potatoes on a clean tea towel and dry thoroughly. Let them air dry while you prepare everything else.
2. Preheat the oven to 400°F/200°C. On low heat, melt coconut oil or ghee in a small saucepan. Place cut potatoes in a plastic bag, seal and shake bag vigorously to coat (this process can also be done on a cookie sheet, drizzle the oil over and toss very well to coat). Add cornmeal and salt to the bag and toss well to coat.
3. Place fries on a lined baking sheet, making sure that they are not overlapping. Bake for 30-40 minutes until golden brown and crisp.
Original Sweet Potato Fries
Adapted from Recipe Collage
Ingredients:
2 Sweet Potatoes
½ tsp. Cayenne Pepper
½ tsp. Sea Salt
½ tsp. Garlic Powder
½ tsp. Cumin
½ tsp. Paprika
2 tsp. Olive Oil
Directions:
1. Preheat an oven to 400°F.
2. Slice the potatoes in half lengthwise and then cut each half into four wedges.
3. Toss the wedges in a bowl with the oil, cayenne pepper, paprika, cumin, garlic powder, and salt.
4. Lay the pieces on a baking sheet. Bake for 35 to 45 minutes, until they’re browned on the outside and tender all the way through.
Serve with plain Greek Yogurt.
Tuesday, April 9, 2013
Honey Greek Yogurt, Granola, Blueberry-Apple Sauce, and Fresh Fruit: Perfect Breakfast!
Sometimes you need a little spice up to your breakfast! I definitely do at times. That is probably why I have been posting so many breakfast recipes. As I was looking through the recipes that I have posted thus far, I realized that they all are sweet and no actual meals. So I will be working on that. Studying has been getting the best of me, and time is limited.
I found this recipe on Sarah Britton's blog. It was a guest post from Green Kitchen Stories. Both of these blogs are great, and I highly recommend them for healthy tips and recipes! Everything that I have made from both of these blogs have be absolutely delicious. Also, not only are they delicious, but all the recipes are loaded with nutrition.
I have been wanted to find something nice and easy to bring to school for my lunch break. This has been the perfect treat! It is filling and seriously tastes so good. I never thought of combining apples and blueberries together, but let me tell you, it is an awesome combination. Recently, I have been using jars a lot, and I love them! They are BPA free because they are glass, and they seal tightly so nothing will leak out. Just so perfect! I highly recommend them.
Blueberry-Apple Sauce
Adapted from My New Roots
Ingredients:
1 cup blueberry (fresh or frozen)
1 apple, diced
2 Tbsp. apple sauce (or sweetener of choice)
Directions:
1. Place all ingredients in a sauce pan over medium heat.
2. Bring to a boil then turn down heat and let simmer for 20 minutes.
3. Remove from heat and blend with an immersion blender. If a chunky texture is desired use a fork.
4. Store in the refrigerator.
Yogurt, Granola, Blueberry-Apple Sauce Assembly
Blueberry-Apple Sauce
Granola (I used homemade recipe soon to come)
Honey Greek Yogurt
Fresh Fruit (strawberries, blueberries, kiwi or any other fruit desired)
Place two spoonfuls of blueberry-apple sauce on the bottom. Then add 2-3 spoonfuls of granola. On top of the granola add 2-3 spoonfuls of honey Greek yogurt. Top with fruit and enjoy!
I prepare this the night before and place it in the fridge to save time in the morning, and it keeps great!
Sunday, April 7, 2013
Nutella Granola
This is another one of my granola recipes that I made for my wonderful sister. However, I think I may have eaten the majority of it. Oops. What can I say, it is just too good to let sit in the pantry!
This granola taste delicious. It contains no oil or sugar! However, there is oil in the Nutella that I added to this recipe, which was definitely worth it. So I guess a very small amount of oil is the correct way of saying it. I have to say my favorite part (and my sister's too) are the whole hazelnuts. They add the perfect amount of hazelnut flavor in each bite. So for future reference, to get the best tasting spoonful, be sure to have a whole hazelnut in your spoon.
My sister came up with the bright idea to add this on top of ice cream to add a little crunch and a chocolate hazelnut flavor. We have not tried this yet, but I believe that you would not regret it if you did. It would be absolutely scrumptious. I love adding crunch to everything I eat, lately. I am not sure why, but I know the next time I make homemade ice cream this granola will be sprinkled on top!
Nutella Granola
Adapted from My Whole Food Life
Ingredients:
2 cups hazelnuts unsalted
3 cups rolled oats
3 T cocoa powder
1 tsp vanilla
1/4 cup applesauce
2 T milk (I used almond milk)
1/2 cup maple syrup
¼ cup Homemade Nutella (or your ordinary Nutella...just won't be as healthy)
1/2 tsp salt
Directions:
1. Preheat oven to 350.
2. Take 1 cup of the hazelnuts and grind them
in the food processor.
3. In a large bowl, combine the ground hazelnuts, the other
cup of hazelnuts, oats, salt and cocoa powder.
4. In a small saucepan, whisk
together the maple syrup, applesauce, milk, nutella, and vanilla over medium
heat until combine.
5. Add the wet to dry and mix well.
6. Spread mixture onto a
lined baking sheet and bake for about 30 minutes. Mix every 10 minutes. Let cool before storing in an air tight container.
*Keep an
eye on the granola for the last 10 minutes because it gets done quickly within this
interval.
Thursday, April 4, 2013
Chocolate Peanut Butter Granola
Being the nice sister I am (at least most of the time), I decided I would make my sister some granola. I asked her what kind she would like. I gave her a few options to choose from, and she picked the flavor chocolate peanut butter.
Of course, what could be better than chocolate peanut butter granola? You are probably thinking, that can not be healthy one bit. However, it is! I used natural peanut butter (you could even use homemade peanut butter, I just didn't have the time for that) and dark chocolate. Yes, dark chocolate is healthy for you in small quantities. So as long as you do not go eating the whole batch, it has health benefitting qualities.
As you will see, the recipe calls for cinnamon. This could be omitted or kept. The reason this is added is because the original recipe was for Cherry Chocolate Peanut Butter Granola. The first time I made this granola I kept it in, but my mom said she could tell. So the second time around I omitted it, and my sister asked if I changed anything because it did not taste as good without it. Regardless, it tastes good no matter what. It is up to your preferences as to whether or not to add the cinnamon in.
Chocolate Peanut Butter Granola
Adapted from Back for Seconds
Ingredients:
2 cups oats
1/3 cup chia seeds
2/3 sliced almonds
1/2 cup peanut butter
1/3 cup honey
½ cup chocolate chips
1/4 tsp. cinnamon (optional)
Directions:
1. Preheat the oven to 325°.
2. Stir together oats, chia seeds, and almonds in a medium bowl. Set aside.
3. In a small bowl, microwave peanut butter and honey until melted. Stir and pour
over oat mixture. Stir well until everything is coated.
3. Pour evenly on a pan
lined with parchment paper. Baked 25 minutes. Stir every 10 minutes.
4. Let sit
for 5 minutes and then add the chocolate chips. Stir to combine, and then wait until dry to store it in a container.
Subscribe to:
Posts (Atom)